


Amazing Artisan Bread for 40 Cents a Loaf - No Kneading, No Fussing, No Kidding
Update: If you're interested, I've written an update on this technique here.
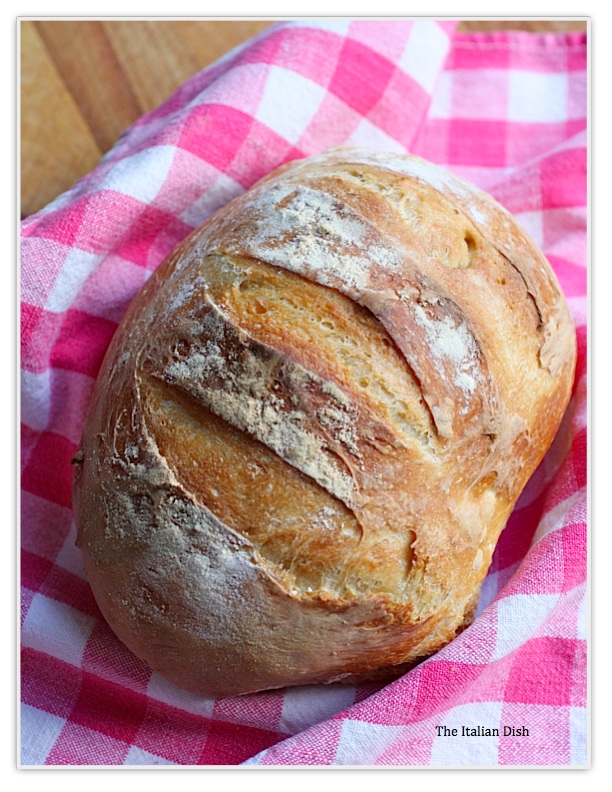
What if I told you that instead of buying bakery bread for four or five dollars a loaf, you could make delicious handmade bread whenever you wanted, at a fraction of the cost and it is so easy a kid could do it? Well, read on because this method of making artisan bread at home will change your life.
You can make incredible bread without having to do all the usual time consuming tasks of breadmaking :
- no need to make a new batch of dough every time you want bread
- no need to proof yeast
- no need to make starters or prefermented dough
- no kneading!
In the last few years, several methods for making easy no-knead bread doughs have crept up on the internet and gained popularity. Among the most popular have been Jim Leahy's No-Knead Bread and Jeff Hertzberg and Zoe Francois' Artisan Bread in Five Minutes a Day. These breads drastically cut down the amount of time and work that it was always assumed had to go into artisan bread making. Even the Zen Master of bread making, Peter Reinhart, has jumped onto the bandwagon, admitting that these no knead methods have made him rethink everything he knew about breadmaking:
"The results have forced me to reconsider all of the premises I once held sacrosanct".
So what is going on here?
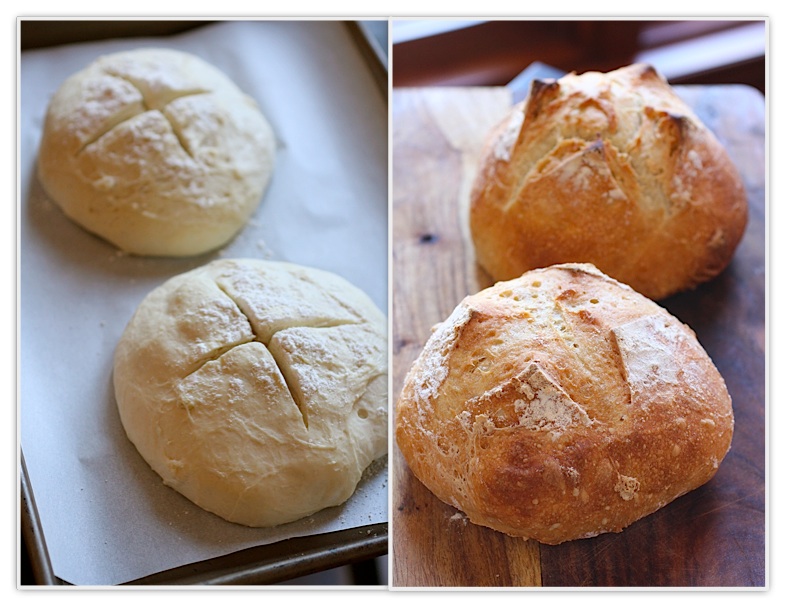
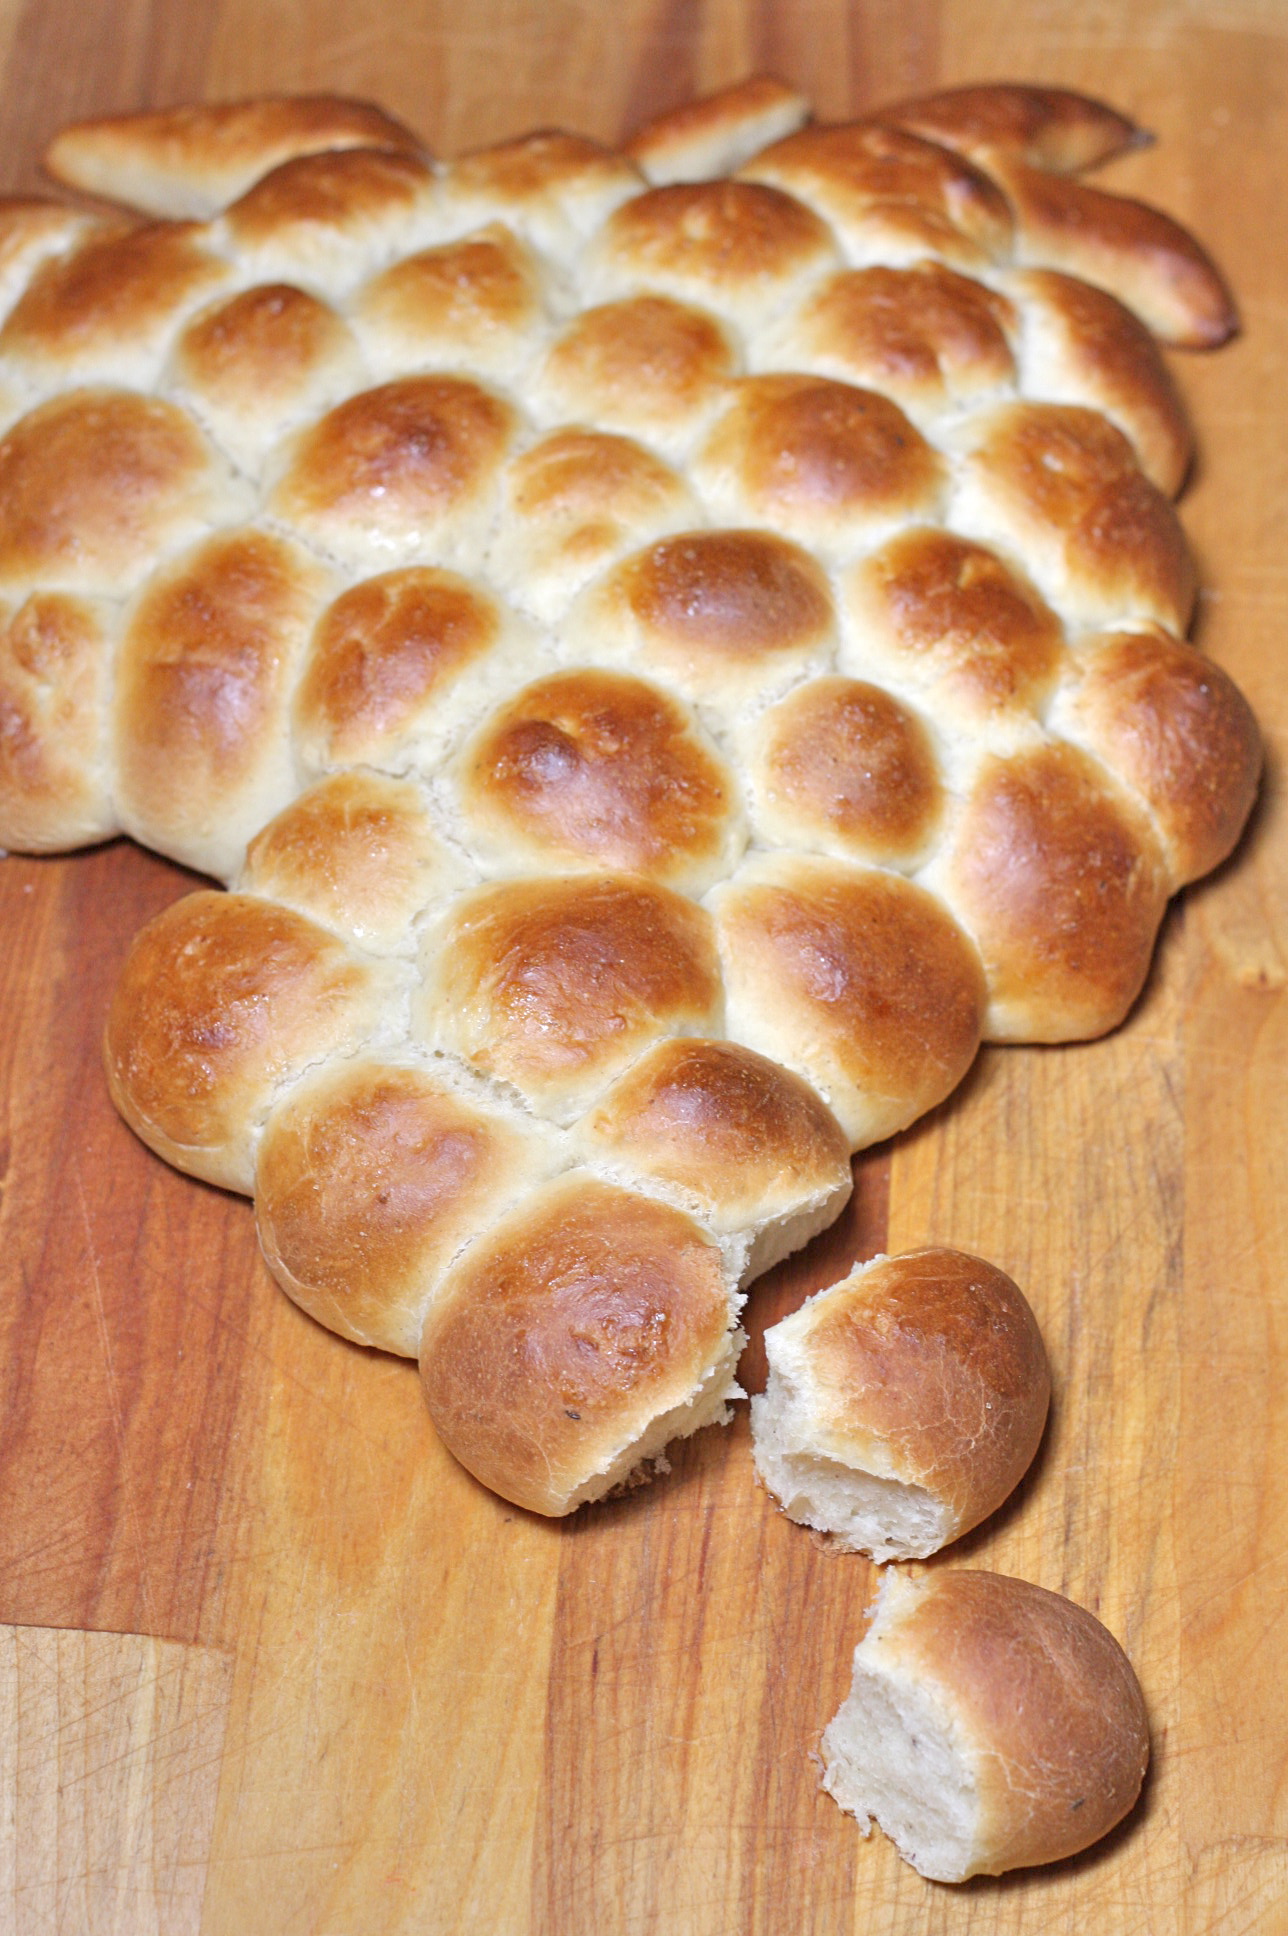
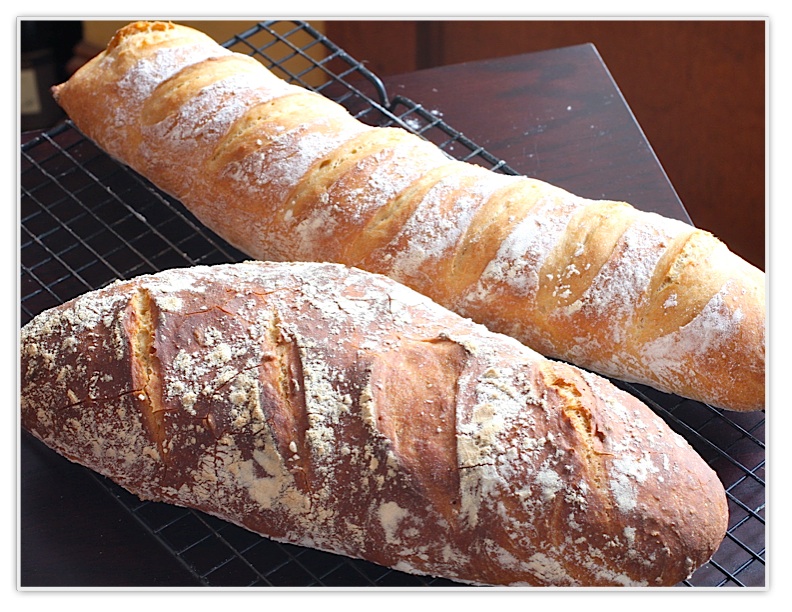
Boules Rising and Boules after Baking
The key is mixing up a high moisture, or "slack" dough, and letting it do a long fermentation in the refrigerator. It's long been known that a long fermentation contributes flavor to dough but it seems it also develops gluten and eliminates the step of kneading. The advantage in using refrigeration is that you can control the fermentation and you can make up a large batch of dough, enough for four loaves, and keep it in the fridge. If you make a very wet dough, it will be able to last in the refrigerator a long time, gaining flavor as it ferments and allowing you to make bread whenever you decide. This is not to say there is not a place for multi-stage, time-consuming bread making techniques which require 15 minutes of kneading - I love making my homemade focaccia, which takes three rises every time I make a batch. But this bread is absolutely a no-brainer. You mix up a big batch of dough in one container, a process which takes only a couple of minutes (remember, there is no proofing of yeast or starters to make). When you want bread, you cut off a hunk of dough and shape it. You can make various sizes and shapes: boules, batards, rolls or baguettes. It's just so convenient and makes such a beautiful bread with a crackly crust, you won't believe it. I've even shaped the dough into rolls. Peter Reinhart points out that the home baker has an advantage over the commercial baker with this technique - the commercial bakery does not have the refrigeration space to use a method like this. As a home baker, we can make up small batches of dough, refrigerate it and enjoy fresh bread whenever we want it. If you are buying fresh bread three times a week at $4.00 per loaf, you are spending about $50 a month on bread! This bread is only about 40 cents a loaf to make. And, since bread is best the day it is made, you don't have to drive to the grocery/bakery to get it every time you want a loaf.
To see how easy it is to get a loaf ready, you can watch me form a loaf in about 30 seconds:
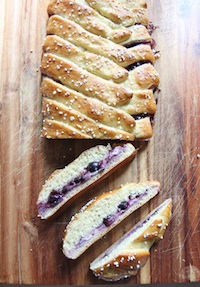
This bread is very versatile, also. In both Peter Reinhart's book and Jeff Hertzberg and Zoe Francois' book, they give you many variations of breads made with the master bread recipe in each book. You can make whole wheat breads, cheese breads, herb breads, breads stuffed with sun dried tomatoes, Challah, Semolina Bread and on and on. Jeff Hertzberg and Zoe Francois have come out with another book, "Healthy Breads in Five Minutes a Day", for people who would like more whole grain recipes and gluten free breads. This is a great book, too, and has lots of wonderful ideas in it. I have all three books and strongly recommend them if you want to try easy bread making. It's nice to be able to make bread whenever the whim hits you - I have several types of doughs in my refrigerator, happily fermenting away.
In these recipes, instant yeast is used, which eliminates the need for "proofing" the yeast. Everything is simply mixed together. If you are interested in learning more about yeast, my recent "Yeast Explained" post may be of interest to you. Instant yeast is sometimes labeled "fast acting yeast" and is sold under the names of "Rapid Rise" and "Quick Rise" yeast. Also, Bread Machine yeast is simply instant yeast. I like to buy my yeast in the little jars instead of the packets because I can use only as much as I need out of the jar and it tends to be cheaper.
One way of letting the dough rest and rise is to place it on a pizza peel, dusted with some cornmeal. This works well when we make pizzas and pop them right into the oven. However, for this the bread seems to stick because you have to let it sit so long on the pizza peel and rest. So I place a small square of parchment paper on the pizza peel and put the dough right on that. When I slide it into the oven, it goes in along with the parchment paper and bakes up beautifully. If you want an extra crispy crust, just remove the parchment paper halfway through the baking time and return the bread to the pizza stone - this is what I do.
The dough can be stored in any plastic container with a lid or a bowl with plastic wrap placed over it. You want the gases to be able to escape as the dough rises, though - so wrap the plastic wrap over the bowl tightly and then puncture a little hole in the top. It is nice to have a dedicated plastic container, though, in the fridge for your dough, because you are going to just keep it in there all the time. Although these containers are recommended by the authors and the King Arthur Flour website has these nice dough rising buckets, I bought a square plastic-lidded container at my local grocery store because I thought it fit in my fridge better. You can see it in the photos below. I place the lid on tightly, but I punched a small hole in the top. This is important to do.
So get out a bowl if you don't have a plastic container, mix up a batch of dough and have your first loaf tomorrow. You won't believe it.
No Knead Artisan Bread
adapted from Artisan Bread in Five Minutes a Day
for a printable recipe, click here
makes four 1 pound loaves.
Ingredients:
- 3 cups lukewarm water
- 1½ tablespoons granulated fast acting (instant) yeast (2 packets)
- 1½ tablespoons kosher or other coarse salt
- 6½ cups unsifted, unbleached all purpose white flour*
(My favorite way to make this bread now is to use half bread flour, half all-purpose flour and throw in ½ cup wheat bran into the dough.)
*After baking, if your bread is gummy on the inside, try either increasing the amount of flour by ½ cup and/or increasing the baking time by 10 minutes.
Instructions:
Mixing and Storing the Dough
1. Warm the water slightly. It should feel just a little warmer than body temperature, about 100 degrees F. Warm water will rise the dough to the right point for storage in about 2 hours.
2. Add yeast and salt to the water in a 5 quart bowl or a plastic container with a lid.
3. Mix in the flour - kneading is unnecessary. (Note: I dump all this in my KitchenAid mixer, let it mix it for just about 10 seconds and then put it in the plastic container. I just find it easier to let the mixer do this part). Add all of the flour at once, measuring the flour by scooping it and leveling it off with a knife. Mix with a wooden spoon - do not knead. You're finished when everything is uniformly moist, without dry patches. This step is done in a matter of minutes. The dough should be wet and loose.
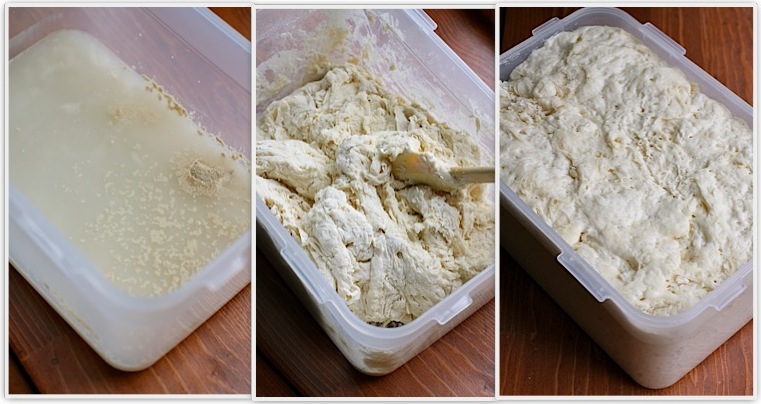
4. Allow to rise. Cover with a lid (not airtight). Lidded plastic buckets designed for dough storage can be purchased many places. (I used a plastic square food storage container I got at my local grocery store. I now use a Rubbermaid 21-cup Dry Food Container. I punched a hole in the top). You want the gases to be able to escape a little. Allow the mixture to rise at room temperature until it begins to collapse (or at least flattens on top), about two hours. Longer rising times will not hurt your dough. You can use a portion of the dough any time after this period. Fully refrigerated wet dough is less sticky and is easier to work with than dough at room temperature. So, the first time you try this method, it's best to refrigerate the dough overnight (or at least 3 hours) before shaping a loaf.
Baking
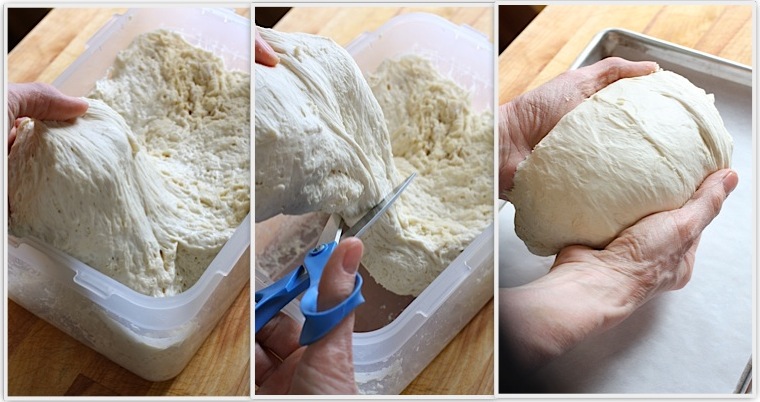
5. Shape your loaf. Place a piece of baking parchment paper on a pizza peel (don't have a pizza peel - use an unrimmed baking sheet or turn a rimmed baking sheet upside down). Sprinkle the surface of your dough in the container with flour. Pull up and cut off about a 1-pound piece of dough (about the size of a grapefruit), using scissors or a serrated knife. Gently stretch the surface of the dough around to the bottom on all four sides, rotating the ball as you go. Dust your hands with flour if you need to. This is just to prevent sticking - you don't want to incorporate the flour into the dough. The top of the dough should be smooth - the object here is to create a "gluten cloak" or "surface tension". It doesn't matter what the bottom looks like, but you need to have a smooth, tight top. This whole step should take about 30 seconds! Place the dough onto your parchment paper.
6. Let the loaf rise for about 30 - 40 minutes (it does not need to be covered). If it doesn't look like it has risen much, don't worry - it will in the oven. This is called "oven spring".
7. Preheat a baking stone on the middle rack in the oven for at least 20 minutes at 450 degrees F. Place an empty rimmed metal baking pan or broiler pan on a rack below the baking stone. This pan is for holding water for steam in the baking step. (If you don't have a baking stone, you can use a baking sheet, but you will not get the crisp crust on the bottom. You will still have a great loaf of bread. Baking stones are cheap and easy to find - Target carries them - and are a must for making pizzas, so go out and get one as soon as you can.)
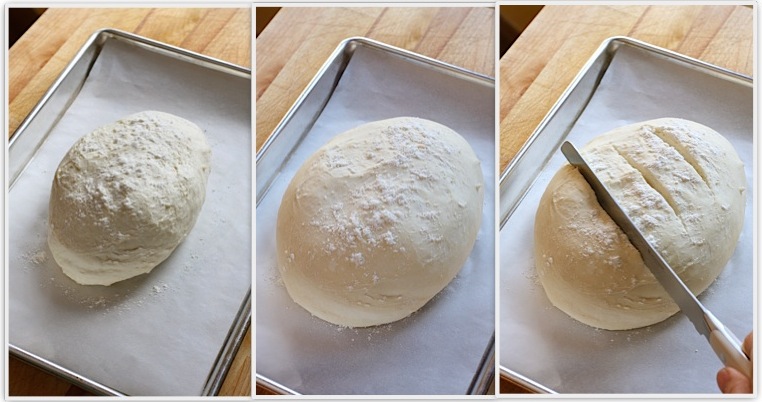
8. Dust the loaf with a little flour and slash the top with a knife. This slashing is necessary to release some of the trapped gas, which can deform your bread. It also makes the top of your bread look pretty - you can slash the bread in a tic tac toe pattern, a cross, or just parallel slashes. You need a very sharp knife or a razor blade - you don't want the blade to drag across the dough and pull it. As the bread bakes, this area opens and is known as "the bloom". Remember to score the loaves right before baking.
9. Bake. Set a cup of water next to your oven.* Slide the bread (including the parchment paper) right onto the hot baking stone. Quickly pour the water right into the pan underneath the baking stone and close the oven door. This creates the necessary steam to make a nice crisp crust on the bread. Bake at 450 F for about 30 - 35 minutes, depending on the size of your loaf. Make sure the crust is a deep golden brown. When you remove the loaf from the oven, you will hear it crackle for a while. In baking terms, this is called "sing" and it is exactly what you want.
* update: I have recently begun skipping this step with the water. I believe it caused my oven window to eventually crack and I have found that my bread is still great even without the water. If you want an extra crispy crust, though, it is worth doing once in a while
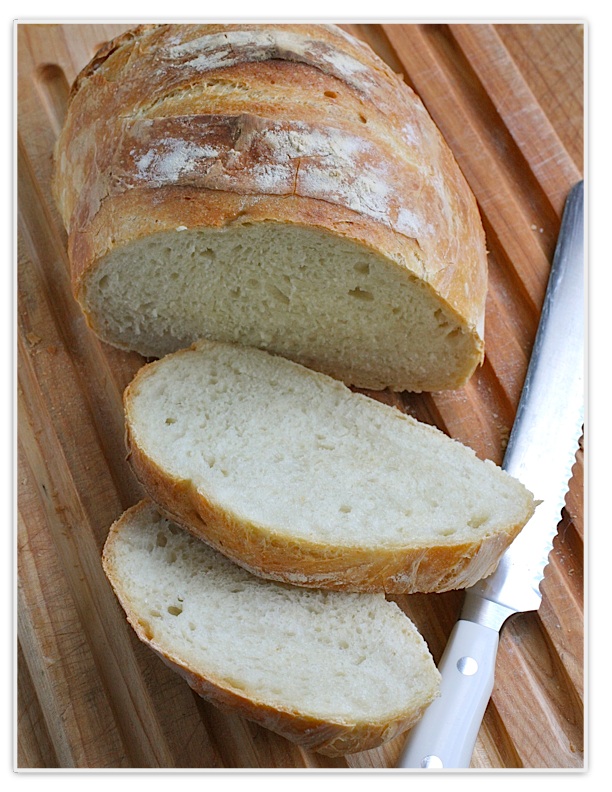
10. Cool. Allow the bread to cool for the best flavor and texture. It's tempting to eat it when it's warm, and that's fine, but the texture is better after the bread has cooled.
11. Store the remaining dough in the refrigerator in your lidded (with a hole punched in the top) container and use for up to 14 days. Every day your bread will improve in flavor. Cut off and shape more loaves as you need them. When your dough is gone, don't clean the container. Go ahead and mix another batch - the remaining bits of dough will contribute flavor to the next batch, much like a sourdough starter does!
Bread is best eaten the day it is baked. Leftover baked bread is best stored at room temperature, unwrapped. Simply place the cut side of the bread on plate or counter. If your bread is gummy on the inside, try either increasing the amount of flour by 1/4 cup and/or increasing the baking time by 5-10 minutes.
Check out the Artisan Bread in Five Minutes a Day website - Jeff and Zoe have great tips and recipes over there.
 468 Comments
Reader Comments (468)
Sorry about the confusion, I would like to make it less dense.
GK
From The Italian Dish:
GK: The bread can become much more dense when adding some whole wheat flour. Check out Jeff and Zoe's tips for making a less dense loaf:
http://www.artisanbreadinfive.com/2008/02/10/qa-dense-crumb
From The Italian Dish:
Lindsay: If you want an extra thick crust, maybe just use all all-purpose flour. This post might help: http://baking911.com/quick-guide/how-to-az/bread-get-good-crust
Thanks for your help. Just in case others were following along, I can pass along what I learned:
What helped me to reduce the density of the bread was to let it rise longer the second time (out of the fridge). I had been letting it rise for 30 minutes. I doubled it, and the bread was much less dense.
GK
From The Italian Dish:
GK: Thanks so much for posting your tip!
Great recipe! I love your tip of just having a 'dough bin.' We live in China, and it's so hard to find good bread. These ingredients are cheap. It's so easy to make! I did cut the salt down to just a tablespoon. Also, it doesn't make huge loaves. I've had to make dough once a week to keep up with the demand :)
just made this bread this weekend, it it the easiest most delicious bread we have had in a while, we loved ,loved, loved it! Thank you for sharing.
I have never baked bread and now I am hooked!! I've made the bread recipe three times which yielded 9 loaves. It took me three tries to get it just right though. I bake my bread in a convection oven for 45 minutes for it to come out as crusty as in the pictures. My 13 year old children say they will never go back to store bought bread. I'm now comfortable enough with the process to begin experimenting with a mixture of whole wheat flour. I'll let you know how it turns out.
Hi....love this recipe! Would like to try a green chili and cheese recipe. Should I just add a cup of cheddar and several hatch green chilis cooked? Paula
I made some of this dough earlier today (between my college classes, because its just that quick) and my husband and I baked some smaller, bun sized "loaves". We used them as buns for rather saucy barbeque chicken sandwiches and they were wonderful!
Im so grateful for this post! Ive made this twice now and we just love it !
Thanks so much :)
Whatever you do, don't use a glass baking dish to create the steam! I poured the water in and the glass baking dish couldn't handle the extreme temperature difference and just exploded! Broken glass was everywhere! But the bread survived!
Love this bread! I need some other things to put into this bread .....to be more interesting especially over the holidays......i.e. for toast.
My dough didn't get very wet...put the water, yeast and salt in my kitchenaid..then all the flour and mixed just long enough for it to not be dry. Will it still work you think? I put it all in a bin to rise like it said.
Elaine, I love your website and your recipes. I was especially eager to try this one, after spending 2 months sailing around and along Italian waters recently and discovering the value of knowing how to make bread while off-shore sailing. However, something is not working for me! I followed directions exactly but the bread failed to rise much if at all. After refrigerating overnight, it was really sticky when took some to start shaping a loaf. So sticky I could barely get it off my hands to shape it. It didn't rise in the 40 minutes, and browned nicely in the oven (following directions on prep-ing that too) but only rose about 1 inch! I used all purpose, unbleached flour, although it was the 'store brand." I re-mixed a whole new batch and it failed the same way the 2nd time. What's happening? Any clue? I am so determined to make loaves that look like yours!
Sincerely,
Gaile
Gaile, Be sure your using instant yeast, sometimes called rapid rise yeast or bread machine yeast. Do Not use "Active Dry Yeast". Also, warm water, just above body temperature, 100 degrees is good, too warm could kill off the yeast.
Gaile, also, if your yeast is old it may already be dead. I've messed up a recipe or two because I didn't realize my yeast was a year or two past the "use by" date. :(
From The Italian Dish:
Gaile: I am mystified! I make a batch of this dough every single week and I have never once not had it rise! Make sure you use instant yeast that is not out of date and do NOT use hot water, which will kill the yeast. Just lukewarm water. The dough should rise way up within an hour. The dough will be sticky to work with but much easier if you wait until the next day, after it has been refrigerated a good while. Also, if you read through the reader comments, you will see that if you add about 1/4 cup more flour the dough will be easier to work with. I do this and it does not seem to compromise the dough at all. Please try again. That is just bizarre that it didn't rise.
hi, cant wait to try this. can this be shaped into a traditional loaf for sandwiches? would baking time be the same? will check out the library and see if they have this book. would love to buy it but cant right now. this looks delicious and would be great for my daughter to make , so easy when you are busy with all the kids.
hi, i've been making your bread for a while. the first time it came out great but then i moved and had a different oven and now i just can't get it down right. the bread takes longer to cook since i have an older oven and it loses heat but then it also burns a little on top and the next day its hard and tough to eat. i was wondering if you had any tips to fix this? i tried putting less flour to make it more chewy but it just didn't cook then and molded the next day.
My mom used to make bread all the time, I was always intrigued, but too intimidated to attempt it.
This bread recipe is soo easy and delicious, my husband and I have been enjoying fresh baked bread
every night this week. Thank you for sharing....
made this and ev1 now is haunting me for the recipe. refering them all to your blog!!!!!!!!!
I rushed thru this post (footbal game on, you know...) so I might have missed if anyone had suggestions as to how to do this dough as rolls. Any hints, please!
Darn it, I thought of a couple more questions: 1) would it be possible to somehow use sourdough starter in place of the yeast? 2) How much dough would it take to make "bread bowls" for soup, chile, stew, etc.?
Another thought....I've seen written some where that potato water (I think the water that potatoes were boiled in...is that right?) is a nice addition to the recipe. Any opinions?
From The Italian Dish:
Darryle: I make rolls with this all the time. Just break off small pieces (remember, they rise in the oven and will be larger) and form them just as you would the larger loaves. Just cut down the cooking time. Bake until they are brown on top. For bread bowls, you have to decide the size you want. I've made bread from this recipe and used it as bread bowls for chili and it was great.
I don't know about the sourdough starter or the potato water - sorry!
About how big of a piece would you break off to make individual bread bowls to hold cream soups? Thank you for the wonderful recipe and for your input!!
I always cringe when I pay $4.00/$6.00/$8.00 for a loaf of bread from our local bakeshop - ...... now I won't have to ......... thanks!! Liz
Hi everyone
I live in England and have been having a go with this - It does it thing/ raises wonderfully in container etc but
(a) main problem is that the crust is soooooooo crusty I have a problem cutting it
(b) does'nt rise too much which means the texture (when cooked) is a little like crumpets rather than bread
Anyone have any solution/s please. Thank you
I'm very unsure of myself when baking bread of any kind. I'm inquiring again approximately how much dough to pinch off to hold about 1 1/2 cups of cream soup. Like the size of a large orange or a small grapefruit? Thank you for your patience with me! Have a great day!!!
From The Italian Dish:
Ell: Actually, that crispy crust is something that we like here. As for your bread not rising, I'm not sure why that is happening. Check the amount of yeast you are using. Your bread should definitely rise more in the oven as it bakes.
Norma: You will just have to experiment with the size of the dough balls. I did that at first when I made rolls and realized that they increase in size as they bake quite a bit. I would think a dough ball the size of an orange would make a nice little bread bowl, but you will just have to experiment and see. The best method is to weigh your dough balls before you bake them and then you will know for sure for next time.
to The Italian Dish
Many thanks for comments - we like crispy but my crust is actually like a rock (I kid you not) I even treated myself to a new breadknife and find it difficult to actually "start" the cut and the knife has (twice so far) managed to "slide" across & chop my finger!! (box of plasters now kept in the kitchen!!)
I use 2 satchets (7gms each) of dried Fast Acting yeast - for each batch - very difficult to buy fresh yeast here
Any comments/ suggestions will be gratefully accepted. Thank you
Wow I have made 3 batches in the last 5 days. Perfect timing for me to see this on Pinterest. With one bday and Thanksgiving I was able to serve my family homemade bread yeah. Thanks so much . I love this Artisan Bread!
I came across this recipe on Pinterest, and decided to try it to have with our Thanksgiving dinner today. Honestly, I wasn't holding out a whole lot of hope, because I've tried other bread recipes and they were ok, but not fabulous. I made the basic dough last night and put two loaves in the oven early this morning, and I couldn't believe my eyes when I opened the oven door - I could have cried! They were the most beautiful loaves of bread I had ever seen, and I did it myself!!! And they had such great flavor, even with nothing added to them (but now I'm going to start experimenting). Thank you so much for posting this recipe - I love your blog, and can't wait to try out some of your other recipes! Happy Thanksgiving!!
From The Italian Dish:
Denise: You totally made my evening! Isn't it fun to bake beautiful bread like that yourself? Thanks for sharing and happy Thanksgiving.
OMG!! Just found your site and tried making the bread. It was unbelievable!! Thank you so much for helping me make my first loaf of bread. My family gobbled it up as soon as it was sliced.
Trying a 2nd loaf tonight. Can I sort of baste the dough with garlic oil before I put it into the oven? I have been told that this is what Wegman's does to their Tuscan garlic bread.
Any advise you can give me will be gratefully appreciated!
Thank you!!
From The Italian Dish:
Mollycatt: Sure, you can do that. I do that sometimes when I bake rolls. Go for it.
Elaine, Thank you so much for getting back to me so quickly. Love your site and have told everyone how great it is!
I just put my first loaf in the oven as I write this. Preparation was quick and easy. I did find that pulling off the dough needed for the first loaf was a bit tricky and "sticky". I'm now patiently waiting for the bread to be done. Will followup with another post the final results.
I wish I could search comments to avoid having to bug you with this question but I'm wondering if you've tried this recipe with honey or sugar, and less salt, for a sweeter bread? I cut the salt to a teaspoon and added a tablespoon of sugar last time I made it, but it didn't change the flavor much. Before I try again with more sweetener I thought I would ask if you or any of your readers have done so already. This bread is amazing, by the way...we bake a little loaf nearly every day--perfect for my husband and me.
I have made this bread over a dozen times. Some to share with friends and family and some for just me and my hubby. And it seems to be unanimous-everyone has raved the outcome. All the loaves have turned out awesome! I used your method of using the parchment paper after shaping the dough but baked it in a cast iron dutch oven for 30 mins with the top on then 30 mins without. I found this method works best for me- my dough, oven and personal preference. The crust seems to be more artisan and uniformed. If the dough feels too wet to handle then I slightly wet my hands and shape the the dough which came out straight out of the refrigerator. I found the dough easiest to shape when the dough is cold. Then let it rise at room temperature for about 30-60 mins. before baking in an oven that's been pre-heated for at least an hour at 450 degrees.
For guests- I serve it with cheese- manchego, gouda, cheddar and other hard to semi hard cheese favorites. After trying the bread everyone- I MEAN EvERYONE has asked me for the recipe in which I have directed to your blog. I am now experimenting with other combinations of different types of flours but find that your mix is the best. Thank you! Thank you! Thank you! for this recipe! I now always have this dough ready in the fridge for bread and/or pizza dough!
Hi, How large should the container be to hold all the rising dough? Thanks!
Hi! I am new to your site. I just put the dough in the plastic container at room temp. Using my Kitchenaid to mix it all was soooo easy!
I was so excited, that I forgot to mix the 2 flours and add wheat bran! Oh well...next batch!!!!
Thanks so much for sharing. I've learned a lot from the responses, too!
Merry Christmas!
Thank you so very much for this beautifully easy recipe! No one in my family has baked bread like this since the passing of my husbands grandmother! Now, we are all making this delicious bread. Thank you! Thank you!
I made this recipe and it was a huge success. I had my reservation based on its unorthodox preparation but it was perfection. I had to add a little more water living in a high altitude dry climate but the bread turned out excellent. Very glutenous and the crust was fantastic. I brought it over to a friends and we dipped it in curry. Pure heaven!
I've never baked bread before, but your recipe seems so simple and easy that I'm very eager to try it. However, my familiy doesn't eat bread that often. If I wanted to cut down the recipe by half, would that include cutting down the yeast as well? I'm rather clueless when it comes to the use of yeast.
Oh my gooooooosh. Thank you a hundred times! I made the dough yesterday, refrigerated overnight, and baked a small loaf this morning. It was perfect! I was so excited to hear the 'sing'! Thank you for the detailed post. I lived in Europe for 5 years as a teen and have missed the bread ever since. This brings back those days of walking the streets and consuming an entire baguette or small loaf on my own. Now I will be addicted to making it at home. Thank you!
To May: This dough lasts forever in the fridge (think about sourdough starter...it can sit there for years!!). So if you don't eat much bread, just make the same amount of dough and let it sit. I imagine you could freeze the dough too. There doesn't seem to be too much you can do to ruin this dough. I've let it sit out all night with no problems, I've let it sit in the fridge for over a week with no problems.
But the real reason I'm writing (again) is to let everyone know that this is truly about as easy and delicious as it gets. I used to use my Kitchenaid mixer but I decided to try mixing it in the tupperware bowl I keep it in, as the instructions state. It was ridiculous! It worked like a charm and there is No. Need. to get your mixer and attachments dirty. A doughy wooden spoon is the only casualty in this dish. I never even wash my tupperware, also as the directions state. My family has been making this for a couple of months now and my husband who doesn't cook at ALL now knows how to mix the dough and bake it (so that I can call when I'm out and about and "order" a loaf to be coming out of the oven when I return). :)
I've adjusted the recipe to use only a tablespoon of salt. That way the bread actually works for pb and j sandwiches, too! And this stuff is out of this world toasted. I pretty much never buy bread anymore.
I am so happy I found this recipe. I am just curious, does the salt really do anything? I am on a strict low sodium diet.