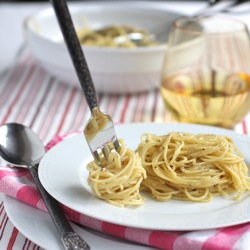
 My oldest son was home from college this weekend and I definitely wanted to fix a classic meat sauce for him, a bolognese sauce, which he loves. But which pasta to fix? I could make farfalle, which he likes a lot and holds the sauce well. But having him home just seemed to call for a fresh fettuccine, which is really a labor of love and the traditional pasta to accompany a bolognese sauce. It's easy to make and yet the time and effort you put into it seems to be a satisfying thing to do when you want to cook something special for someone.
I really love dried semolina pasta, but I have never found a dried fettuccine that I like. I have tried many brands and even the ones made with bronze dies. So when I want fettuccine, I prefer to make it by hand - fresh. I really hope that you try it. Make it on a Saturday or Sunday when you have lots of time and really enjoy the process. Pour yourself a glass of wine and have fun.
 I must say, though, that in the years when I was first married and had a hand cranked Atlas pasta machine to roll the sheets out with, I did not make pasta as much as I do now. That is because I eventually bought a KitchenAid mixer and purchased the pasta roller attachments. To make fresh pasta now is a snap. The machine just basically cranks the rollers for you, instead of you doing it yourself. I had the standard mixer first and then a few years ago upgraded to the professional stand mixer, which can do a triple batch of dough for pizza or bread. A real work horse. This machine has been my partner in the kitchen and I really don't know what I would do without it. This weekend alone I used it to make pancake batter, make focaccia dough, grind meat for the bolognese sauce and make the fresh fettuccine. If you don't have a KitchenAid mixer, I like making pasta also with a hand crank machine like this one.

To make traditional pasta dough by hand, you only need flour and eggs. That's it. Sometimes recipes will tell you to add water, salt or olive oil, but you really don't need them. Water, I believe, makes the pasta gummy. Flour and good fresh eggs are all you need. You usually mound the flour on the counter and make a well in the center and beat the eggs with a fork and start incorporating the flour, little by little. But I like to do this in my mixer now, with the dough hook. It really is the same action. I place some flour in the mixer bowl, break the eggs in the middle, attach the dough hook and start mixing. It does the same thing as when you start mixing by hand with a fork, only easier. If you have a KitchenAid mixer and the dough hook, try it.

I usually figure that 3/4 cup of flour and 1 egg will feed 2 people. That's my beginning measurement. But I always add more egg or just egg yolks, to make it richer. This weekend I tripled the recipe and used 2.25 cups of flour and 4 eggs plus one more egg yolk. And if you remember my
pizza post, when making doughs you add most of the flour to the wet ingredients and at the end slowly add only how much more flour the dough will take. This is a very important technique to know and you will use it whenever you make any kind of dough.

Fresh Pasta
Ingredients:
- 1.5 cups Italian 00 flour or unbleached all purpose flour
- 2 eggs minimum (I always add a couple more eggs or egg yolks to make it richer - this is optional)
this makes about 4-5 servings
Instructions:
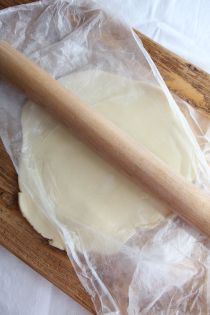
Mound 3/4 of the flour on counter or in mixer bowl. Make a well and break eggs in the center. Begin beating eggs with a fork or, using dough hook, start mixing. When most of the flour has been incorporated, begin adding the rest. Only add as much as the dough will take. You want a firm dough, not sticky, but not completely dry. Cover the dough in plastic wrap and let it rest at room temperature for at least 20 minutes.
Cut off a third of the pasta dough and, using the roller attachment, being to roll out dough. Start at #1 on the roller attachment. Keep dusting the dough with flour so the dough won't stick. When the dough comes out, fold into thirds and put it back through the rollers. Do this several times. The dough will become very soft. Dust the dough again with flour and move the rollers to #2. Put the dough through again.

I put the dough through twice  at every number. Keep going until you reach #5. Put the dough through this number once. The dough strip will be very long. Place on floured counter and cut into 10 inch lengths. Place on floured towel to dry out for about 10 minutes before cutting. Do this with the remaining dough.

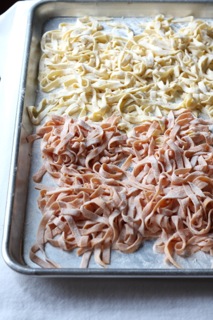
Switch to the fettuccine attachment and run dough strips through the cutters. Mound the fettuccine in little "nests" on a floured towel to dry out.

After about 10 minutes, fluff the nests so the fettuccine doesn't stick together. Do this a few times and then leave the pasta alone, because it becomes brittle as it completely dries.
 You can leave the pasta on this floured towel until you are ready to use it. Marcella Hazan says she even stores hers in airtight containers after it is completely, thoroughly dried.
By the way, if you are interested in fresh pasta, this month's issue of Saveur magazine is about Classic Pasta - how to make it by hand and how to make a good bolognese sauce. The recipes are diverse - every good Italian cook has their version. It's a beautiful issue.


 8 Comments


