How to Make Homemade Gnocchi
 November 15, 2008
 It's gotten cold outside and so it's time to make gnocchi. I hardly ever make this in the summer, but in the winter, this is such great comfort food. Gnocchi is a lot of fun to make - it's like playing with Playdough. I've included a video in this post to show you how easy they are to roll out and cut. You can make them when you don't have anything else around for dinner because the ingredients are all things you have on hand anyway - flour, potatoes and eggs. And now it takes me even less time to make them. Most cooks think you have to run the finished gnocchi over a fork or grater to get those ridges that will catch the sauce. That's how my mom and I used to make it. However, when I have gone to Italy and ordered gnocchi, it is very often made without those ridges. They are just nice fluffy little pillows. I know that Todd English makes them this way, also. And I have come to actually prefer the texture of the gnocchi without the ridges.
There are two pieces of equipment that you really should have to make gnocchi. One is a potato ricer. The consistency of the potato is important and you can really only get it with a ricer. The other piece of equipment is a pastry scraper
. It will make it a whole lot easier to use a pastry scraper because it is ideal for cutting the gnocchi and then you have to lift the gnocchi gently after they are made and it also helps afterward with cleanup of the flour on the counter.
The potato for gnocchi should be dry. Lots of recipes, including Marcella Hazan's, call for boiling the potato in the skin to reduce the chance of water getting into the potato. But why boil it? I bake the potatoes so they are nice and dry and perfect for making gnocchi.
Gnocchi
for a printable recipe, click here
Ingredients:
- 2 medium baking potatoes, about 1.5 pounds total (doesn't have to be exact)
- 2 egg yolks
- almost 2 cups flour (you may not use all the flour)
Instructions:
Bake potatoes in oven until tender. Let cool just until you can skin them, right before you make the gnocchi. The potato needs to be warm, or else the gnocchi will not turn out right - the flour and potato will not bind with the egg.
Scoop out potato flesh and put through ricer into a bowl. Add slightly beaten egg yolks. incorporate about 1.5 cups of the flour and mix until a dough is formed. Place on counter. Using some of the rest of the flour, knead lightly until you have a nice dough formed, one that is not too sticky but yet is not super firm. If you feel you have obtained the right texture for the dough, do not continue to use all the flour.
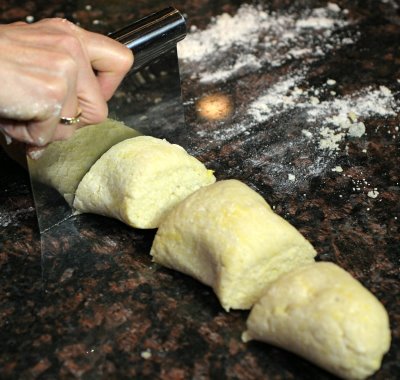
Cut the dough into three sections with a pastry scraper. Roll out the sections into cords and then, with the pastry scraper, cut the cords into one inch little gnocchi. Set gnocchi on a lightly floured towel until ready to use.
Bring a large pot of salted water to the boil. Add half the gnocchi and put on a lid. When the water comes back to the boil, remove lid. When the gnocchi float to the top, cook for one minute longer. With a spider, remove gnocchi and place into a serving dish and toss with your sauce. Repeat with remaining gnocchi.
You can serve the gnocchi with any sauce you like - just olive oil and cheese, a marinara sauce or even a meat sauce. If you've never eaten homemade gnocchi, give them a try. It's much easier than you think!










Reader Comments (51)
these with pesto were my favorite meal when I was a little girl, and my great aunt always made them for my birthday dinner, and she'd go into San Francisco on a train to get me a St. Honore cake from the best Italian bakery there, a tradition that survives til this day, one day I asked her to show me how to make them so I got to spend an entire day with her learning how, it was a huge production, starting with pounds of boiled potatoes on a huge floured board sh'd make a "bowl" in the center to add an egg, a handful of flour then mixed it all together into a dough adding some more flour every now and then, then she floured the whole board and rolled out the dough very thin, then cut it into dozens of roughly one-inch squares which she piled up on one side of the board then we rolled each square down the back of a fork so that the ends cuurved into the center, a skill it took me hours to master and which I'd have to relearn every time we'd make them do you know how to do this? if so I'd love to see it in a video as I figure I'll forget it completely if I don'tat least see it again